Welcome back. In this session, I have tried to keep the steps to drawing very simple, but I will provide some explanation for each step so you can draw more easily. I am also going to post some pictures from my time providing this how to draw lesson...at least one or two. I will include more when I post the how to draw lesson for R2-D2.
This is from May 22 at the City of Ontario Library where we all met in the Senior Center. It was a Star Wars evening at the library and they had put on an excellent program. I was a guest artist teaching the kids how to draw Darth Vader's helmet, and later R2-D2. Time really went fast for a one hour workshop. But, I think that we all had fun. I tried to be as clear as possible, as many of the learners were very young, but there were some older learners in the room too. I was impressed by the number of parents who came along and learned to draw with their children.
This is me at some point during the lesson. I am not sure what I was drawing here? I had been doodling a picture of Boba Fett's helmet just before the workshop to put me in the proper frame of mind. I was also impressed at the number of children who could remember details that went on a particular feature. Many had a keen sense of perception. That is an invaluable tool for the person desirous of becoming an artist. You'll notice to the right of the easel, my drawings of R2-D2.
Here's that helmet of Boba Fett I was talking about. I left it uncompleted, but will finish it soon, and then I will post on here with a completed look to the drawing. It was a doodle, after all.
Now on to the tutorial....
(You can click on the image to view larger)
 The dashed lines you see are guidelines. I should probably mention this. As you draw your picture it is important to draw lightly, because it will be important to erase some of the dash lines, as well as to make your drawing cleaner. It is also important to keep a good drawing eraser handy. Not that you will make a whole lot of mistakes, but it is critical to present your best quality of work when you want to show off your super skills. Draw lightly so you don't have to work hard at erasing, and don't worry too much about mistakes. They happen to the best of us.
In Step 2, you will want to observe how their are lines coming down from the side of Darth Vader's helmet. I think if the lines went beyond the helmet, they would eventually meet to form a triangular tip. At the base of the helmet, I was guessing here of the length, is the bottom part of the helmet, formed by a curved line. Also notice that the bottom half of the circle is now dashed, and will likely be erased soon. you can do that after you complete the third step.
In Step 3, Notice how Darth Vader's helmet is starting to take shape? Remember to use your guide lines to create the round letter "m" shape to connect with the sides of the helmet. When I am teaching kids to draw, I usually will share how it is often useful to recognize letters and numbers as shapes to incorporate into the picture they are making. Can you see any other shapes, letters or numbers that will help you draw this picture better?
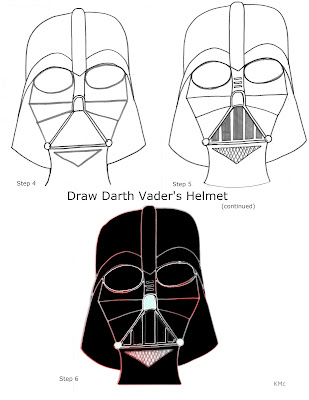
In Step 4, more details become apparent, and any dashed lines can now be erased. What shapes do you recognize filling in the form of Vader's mask? When you have connected your lines as shown, then proceed to Step 5. When I drew this picture, I was working from memory. It is probably a good idea to look at the details from a movie clip, a statue or action figure. Some of the kids at the workshop even had an actual mask. Looking at a reference object will help you with incorporating more details and achieve a better likeness. The final process in Step 6 is to color in the picture. I left out any light source as this was not a focus for the lesson. But, if you notice in pictures, there are often spots on Darth Vader where light is shining off of the glossiness of his helm.
I hope you have enjoyed this lesson. If you have any questions, don't hesitate to send me a message. I will be glad to help you with your question.


No comments:
Post a Comment
Please leave comments. I welcome feedback.